
Simple Half Cleaning of Lawn Mower Carburetor

How to Clean a Lawn Mower Carburetor While Still on the Machine
When springtime rolls around and everyone brings out their lawn mower to perform the first cut of the season, many people are dismayed to find that their mower will not start!
Further complicating the matter is that the lawn mower shops are expensive and overwhelmed. But if you are tempted to consider junking your gas mower and buying one of those new battery-operated electric lawn mowers . . . DON’T DO IT! The average electric lawn mower battery usually costs between $100 to $300, will only run for about 50 minutes per charge, and will die in about 2 to 5 years. And, if you accidentally wait until your grass is too thick or too tall, gas-powered lawn mowers provide more muscle — the horsepower of most electric mowers is half or even less than half of a gas-powered mower.
Am I advising you to never get an environmentally-friendly, quiet lighter weight electric mower? Nope. Electric mowers are nice – I have a CORDED electric myself for a small area in the back. However, it may be wise to wait until batteries are improved and the prices come down for a cordless lawn mower.
The most common problem with a gas mower is a clogged carburetor. This occurs due to all the additives put in gasoline today. As gas sits in an used carburetor over the winter, a sticky varnish-like substance tends to clog up the tiny little passageways inside a carburetor. And about 90% of the time, cleaning the carburetor is all that is needed to get it going again, which you can do yourself for little or no cost! And it can be fun to help your friends, or to develop a little money-making side business. Since small hands and a bit of patience are helpful, women are often better suited to work on carburetors! Carb work is NOT for men whose motto is, “If it won’t fit – force it!”
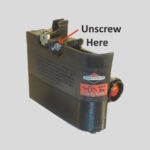
I usually just remove the carburetor and clean the whole unit very well, (which I will put in another post), but some people like the idea of cleaning it without removing it, which is faster and sometimes works. So, I will start there, and I will use a common engine such as a Briggs and Stratton with a metal carburetor for my example.
Get a pair of latex gloves, a wire bread wrapper (stripped of its paper), a spray can of carb cleaner, something small and long that can slip in a small space under the carb (to catch and direct the draining gas into a container such as a plastic pipe cut in half or a halved tall aluminum pop can) and grab a ½ inch wrench.
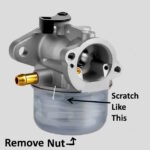
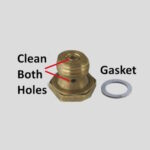
Start by making a little scratch on the outside of the carb bowl and just above it. This is unnecessary, but will make it simple to put the bowl back on in the same orientation that it came off. If the bottom of your bowl has one side that is deeper, this is to give the float room to drop down. If you don’t have two scratches to line it up again, then you will have to turn the bowl until the deep side rests under where the float drops down. Next, with gas catcher at the ready, take your wrench and remove the nut on the bottom of the carb. Catch the old gas that comes flowing out and set it aside. (Some people legally discard old gasoline, and some put it in their car. But be aware that skin can absorb gas). Remove the top of the air filter and spray carb cleaner downward so the spray runs into the carb. Look to see if the nut you removed from the bottom of the carb has a hole in it – which it usually does, so that makes it a main jet that should be cleaned. Spray the nut with carb cleaner and run a tiny wire through the holes until they are clean. Be careful the rubber washer surrounding the top of the bowl stays in place. (It is better not to get carb cleaner or it, as this often makes it flabby and loose fitting). Either leave the rubber gasket in place or remove and clean it with soap and water and clean the circular area around the edges of the top of the metal bowl (where the gasket normally sits), then carefully put the gasket back on making sure there are no twists. When you push the metal bowl back up into place, if you did not make scratches to line it up, take note if it is the kind of bowl that has more room on one side. If so, turn it so the roomy side where the little plastic doughnut-like float drops down. Once you have the bowl back in place, make sure the nut still has a little washer/gasket that goes around it. (If this small gasket remained stuck to the bowl, and it is undamaged, just leave it alone). These two washer/gaskets are what keep the carb from leaking gasoline.
Now that you are putting the clean bowl back in place, first make sure that the bowl gasket is in place, thread the nut in, (at first by hand and then tighten it up with a wrench). Now, pour some clean gas in the gas tank and see if your mower will start. If so, congratulate yourself and put the air cleaner back together!
Suggestions: Take your cellphone. Any time you are going to remove parts, take a picture before you do it. If you get stuck, go to YouTube.
Problems: if the rubber gasket is in bad shape, you are going to have to stop and get a replacement. Write down the model number off some part of the engine which is usually printed somewhere on the engine (not the one on the body of the mower). Go to a mower shop with gasket and engine model number in hand and get a new one.